How to Read Deeper START: Understanding App Display
There are two ways you can view and interpret sonar data – by using Basic or Raw sonar display mode.
-
Basic display
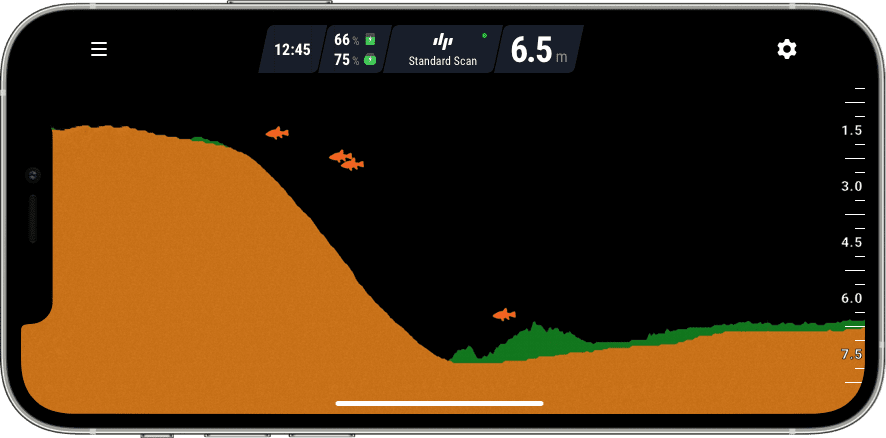
Basic sonar display mode will simplify the sonar data display to display only the most essential information. You will see fish icons, bottom in orange colour, and weeds or silt in green colours. We recommend starting with the Basic sonar display setting if you are new to using sonars. After getting used to the Basic sonar display, you can switch to Raw display for more advanced and accurate fish finding.
-
Raw display
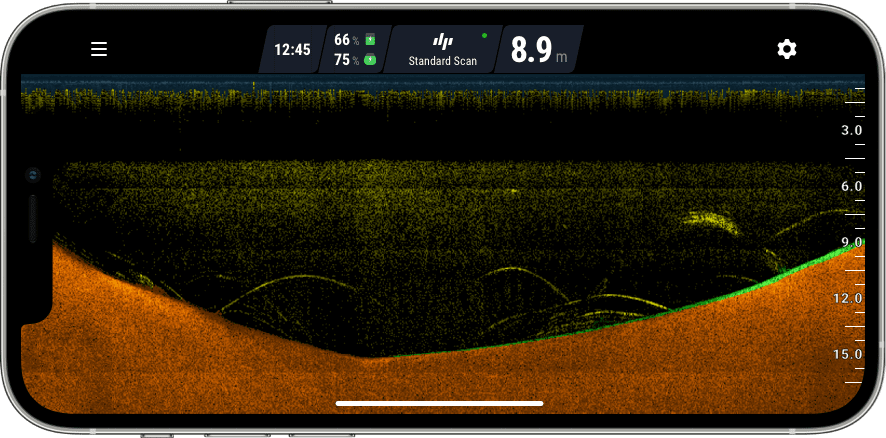
Raw sonar display mode will show you sonar data as it is – without any filters or simplification. This is a more advanced method of viewing and interpreting sonar data, but it is more accurate than the Basic sonar display mode.


Interpreting data using Basic sonar mode
Using Basic sonar mode is extremely easy, and it’s recommended if you’re a beginner angler or an angler who never used sonars before.
-
Fish Size
The Deeper START displays three sizes of fish icons. The fishfinder interprets the sonar data it receives and tries to determine if it is a fish. It does this based on factors like the size of the object and the strength of the sonar return. Please keep in mind that even the most advanced units aren‘t 100% accurate in interpreting data correctly. A few smaller fish swimming closely together can be marked as one big fish or some underwater objects or vegetation may sometimes give readings similar to that of a fish.
-
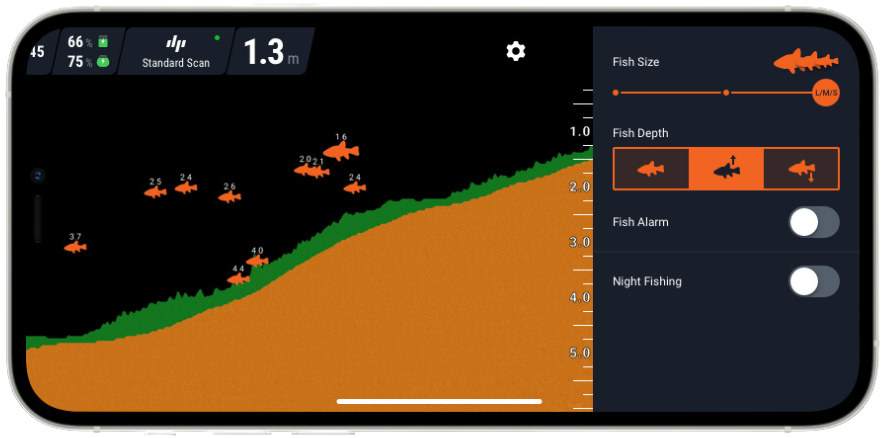
Fish Depth
The Deeper START will display fish icons at various points on the screen, representing fish location in the water column. By understanding if a fish is toward the surface of the water or cruising at the bottom, you‘ll be able to chose the best bait to catch that fish.
There are two options for measuring fish depth: from the surface to the fish or from the bottom to the fish. You can choose the one that is most convenient for you through „Settings“ in the application.
-
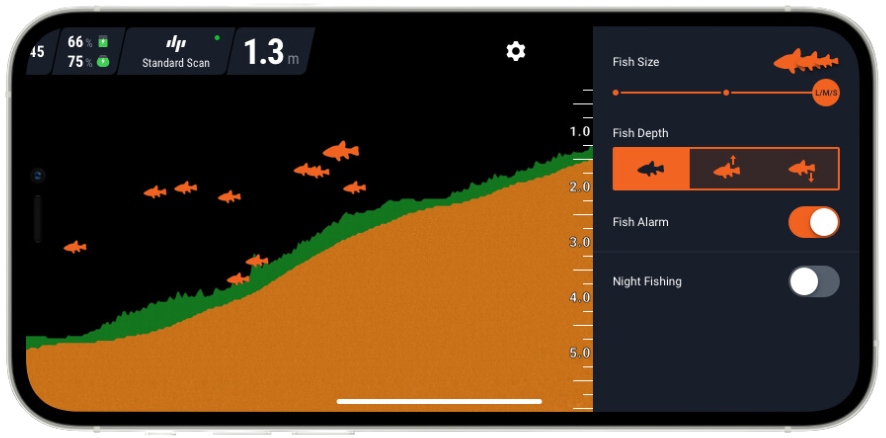
Fish Alarms
Fish Alarm feature enables sound notifications which are played when a fish is picked up by your Deeper. With the fish alarm, on you can be sure you will not miss a fish even when looking away from the screen.


Collapsible content

Bottom Structure
Fish finders are ideal tools for reading depth, seeing the bottom contour and finding underwater features. Sometimes this information will be more valuable to you than actually marking fish.
Vegetation and weeds
You may want to locate vegetation and weeds as potential areas to cast to (predator fishing) or as areas to avoid (feeder fishing). By knowing the vegetation, you can locate plant life, determine predator hiding spots and ambush points.
Drop-offs
Drop-offs are the spots that deserve extra attention, especially steep ones. The bigger, more pronounced, the better. Fish like drop offs because it gives them access to easily available food sources, but is in close proximity to the protection of deeper water.
Points
Points are more gradual than drop-offs, but spotting them is just as easy. Make sure you maintain a steady speed when reeling so you can get an accurate reading on how steep the incline is.
Interpreting data using Raw sonar mode
Raw sonar mode is an advanced way to locate fish and bottom features. We recommend using this mode once you feel confident using your Deeper START or if you had previous experience in using sonars.
1. Identifying fish using Raw sonar mode
-
Fish arches
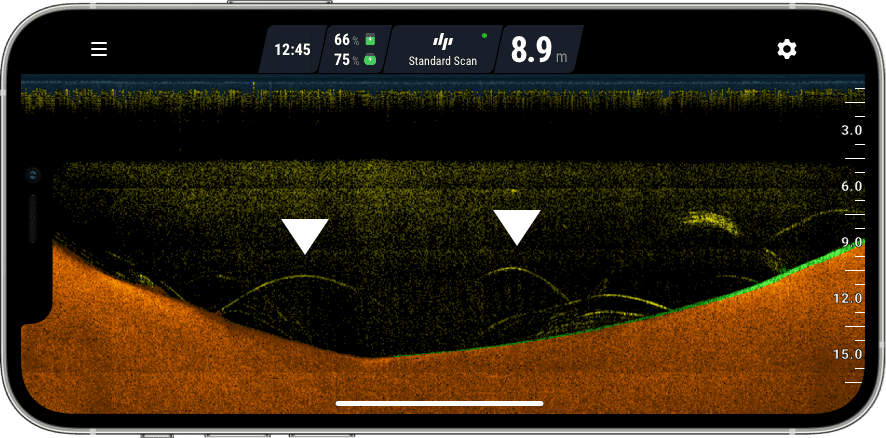
Identifying fish using fish arches is an advanced and the most accurate method of locating fish. To use this method, make sure the Fish Icons setting is turned off.
Fish will show up on your screen as an arch (the reason why they are shown as an arch is explained in detail here). But it’s important to remember these arches can vary in size (length and width), and might not be a full arch – look out for those half arches too. The screenshot below gives some nice examples of different arches. They vary in length and width, and some are not full arches, but these are all fish.
-
Fish icons
Fish Icons are a useful tool when you are getting started with a sonar device: your fish finder interprets the sonar data it receives and tries to work out if it is a fish or not. It does this based on factors like the size of the object and the strength of the sonar return. In case of the Deeper sonars, we use an advanced algorithm in the Fish Deeper App to interpret the data. Unfortunately, even the most advanced units aren’t 100% accurate in interpreting correctly.
So for the best accuracy using your fish finder, you need to learn to read the data yourself and turn off the Fish Icons.
It’s time to take the plunge and switch off Fish Icons – you’ll be rewarded with more accurate readings of where the fish are. Plus there’s the added bonus of learning and refining a new skill.

2. Judging fish size using Raw sonar mode
Now that you have spotted some fish arches, it’s time to make sense of what each arch tells us about how big the fish is. So let’s discuss length, thickness, and half or full arches.
Collapsible content

Fish arch length
The most common mistake anglers make when reading their fish finder is thinking that a long arch means a big fish. This is not the case. On your sonar display, you should think of length as representing time. For example, imagine you keep your fish finder stationary in the water (in other words you are not reeling or trolling it). If there is a fish underneath that is also stationary, what will you see on your fish finder display? You will see one continuous line. That doesn’t mean there’s a blue whale stranded in the pond you’re fishing. It means there is a stationary fish under your fish finder, and it might be a very small one.
Now let’s imagine another scenario – again your sonar is stationary, but this time 2 fishes swim through your sonar beam, one big and one small. The big fish swims very quickly through the sonar beam, the small one swims slowly. Which one will make the longer fish arch on your screen? The answer is the small one. That’s because a slow moving object will leave a longer mark than a fast moving one, whatever their size.
Take a look at the screenshot below. This return is from a school of bait fish. Notice how long some of the arches are. This may be because the sonar is stationary or moving very slowly, or because the fish are only moving slowly. Either way, it’s a good illustration of the fact that a long fish arch does not necessarily mean it’s a big fish.
Fish arch width
So length is not a very good indicator of fish size. It’s much better to look at the width of the fish arch shown.
Just remember this when you are interpreting fish arches:
think vertical, not horizontal.
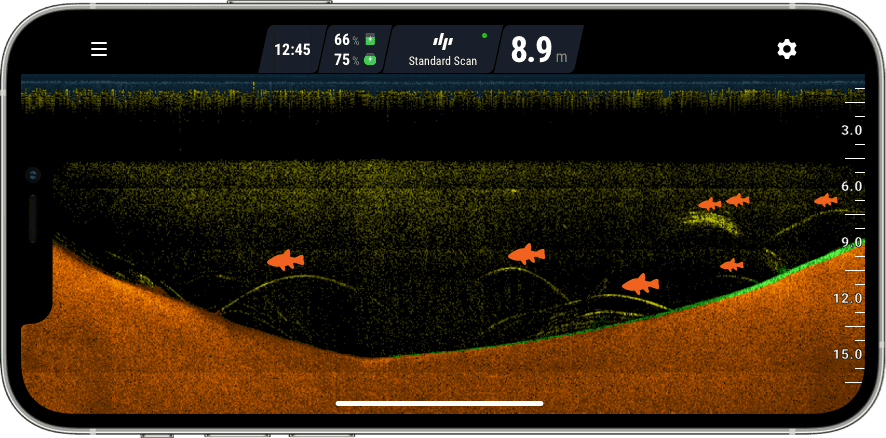
Even if the arch is short, if it is thick then it means the return has come from a big fish. Take a look at this screenshot again. Of the 4 fishes shown, which one is the biggest?
The answer is the fish on the bottom right. All the arches are roughly the same length (and they are all quite short). But the thickness of the bottom right arch tells us it is the biggest fish. This fish is not a monster, but it would be a decent catch.
Half or full fish arches
The final point to remember when you are looking out for fish arches is that it doesn’t need to be a full arch. Half arches (like the ones shown in the screen shot above) also show that there is fish. In our tutorial on how sonars work, we explain in detail why sometimes you get a full arch and sometimes you get a half arch. The short answer is that you will get a full arch if a fish swims through the whole of your sonar cone, and a half or partial arch if they only swim through part of it.
But what’s important to remember when reading your display is that a half or partial arch could still be a big fish – the quality of the arch is not an indicator of how big the fish is.
So be on the look out for both full and partial arches, and remember that the thickness of the arch is the best indicator of fish size.
Finding bait fish on your fish finder
Bait fish will show on your display as dashes, lines or even just dots, so they can sometimes appear similar to vegetation. There are 3 key differences though:
The bait fish will usually be suspended in the water, not on the bottom;
The your fish finder will show bait fish in a different colour to vegetation (in the case of the Fish Deeper App’s standard colour display, they show as yellow rather than green).
The bait fish will often be in balls, which will then be shown like a cloud or cluster, rather than lines.
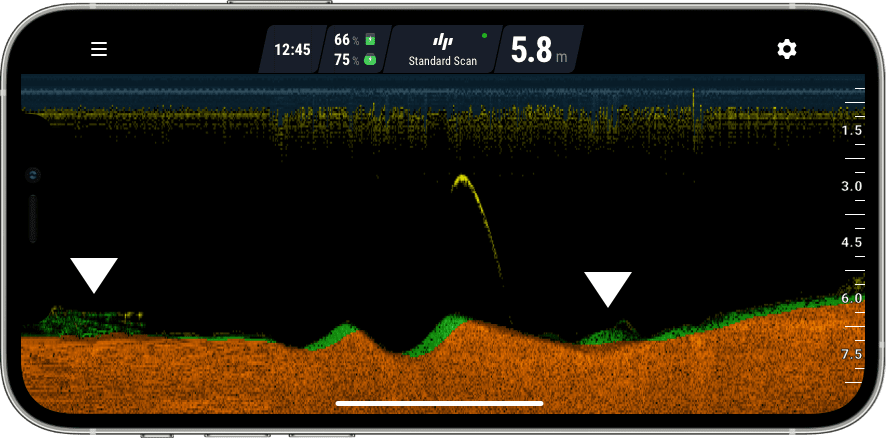
The screenshot below shows both individual bait fish and a ball of baitfish. Notice the difference in colour from the green vegetation on the bottom.
Spotting a trophy fish on your finder display
So, let’s bring together what we’ve learned by remembering 2 key points:
1. Think vertical, not horizontal – the width of the fish arch is the biggest clue to the size of the fish.
2. Arches can be half or full – a half or incomplete arch doesn’t mean it is a smaller fish. Again, the width is your best clue.
Your fish finder isn’t going to tell you which species of fish it is, but now you know the size you have a good chance of working out the species based on the lake or river you’re fishing, and the depth at which you find the fish.
So when you see an arch like the one below on your screen, you’re about to catch BIG!
3. Identifying vegetation and bottom hardness using Raw sonar mode
You have already learned how to identify bottom structure, drop-offs and points using the Basic mode. When using Raw mode, the logic of identifying those bottom features is the same. However, Raw sonar mode gives you an enhanced ability to identify the thickness and size of weeds, as well as bottom hardness.
-
Vegetation and weeds
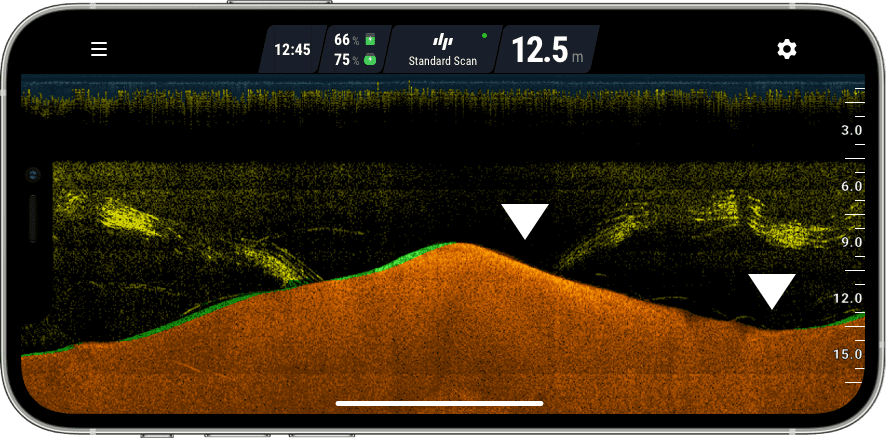
When using Raw sonar mode, you can see the underwater vegetation in more detail. Weeds will look like spotty vertical structures of green colour. You will be able to see whether those are thick weeds or sparse individual plants. In this screenshot, we see a big amount of long, thick weeds.
-
Bottom hardness
When Raw mode is enabled, you can identify which parts of the bottom are harder, and which are softer. The colour and thickness of the line representing the bottom is a great clue to bottom hardness. The intensity of the sonar return from a hard bottom will be a different one from a soft bottom, so the colour will differ. Soft bottoms will be shown of dull brown colour, while harder parts will be of a more vivid and bright orange colour.

