How to Read Deeper PRO/PRO+ 2 Fish Finders: Understanding App Display
and use the data to catch more and catch bigger
Just getting started using a fish finder? Know the basics but want to get more out of your fish finder? Not sure you’re reading your fish finder display correctly? Don’t worry, we’re here to help. This short tutorial will teach you how to make sense of your fish finder display so you can tell what’s a bait fish, what’s a trophy catch and what’s just a submerged tree that you’ll snag on. Take just 7 minutes to go through this tutorial and at the end you’ll be able to read your fish finder display for:
-

Identifying fish
-

Judging fish size
-

Identifying different types of underwater structure
-

And judging bottom type and hardness
How Sonars Work
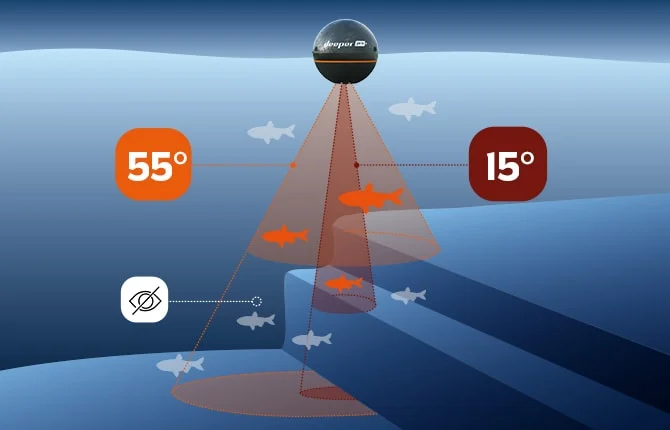
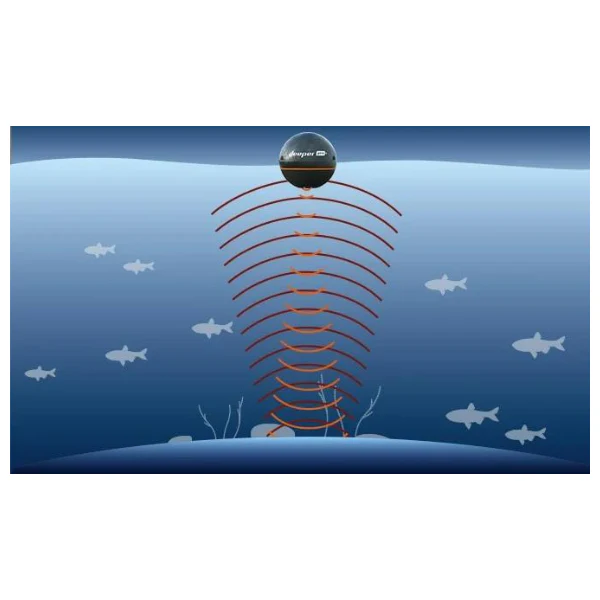
In this blog we’re focusing on the actual images you see on your screen, so we won’t be getting too technical about how sonars work – but our page on how sonars work will tell you all you need to know. But for now there are a couple of technical points you need to remember. First, that fish finders scan in cones. Why does this matter?
Collapsible content
Sonar Beam sizes
The size of the area you’re scanning will be affected by the angle of the cone. A wide beam cone scans between 40° - 60°, meaning you’ll be covering a large area. A narrow cone will scan between 10° - 20°. So make sure you’re aware of whether your fish finder is using a wide or narrow cone when you’re looking at the data on your screen. The Deeper PRO+ 2 has a wide, medium and narrow beam scanning (47°, 20°, 7°), PRO has a wide and narrow beam scanning (55° and 15°), the Deeper START has a medium/wide beam (40°).
How to read sonar display
One other point to remember about how you sonar works is that it is constantly sending and receiving data, which means your display will be continually scrolling. The current scanning data will be on the right – the further left on the screen, the older the data.
So just remember these 3 points when you’re looking at your sonar display: 1. Know if you’re scanning with a wide or narrow beam. 2. The screen is constantly scrolling – this doesn’t mean your sonar is moving.
1. Identifying fish
-
Fish Icons
Fish icons are a useful tool when you are getting started with a sonar device: your fish finder interprets the sonar data it receives and tries to work out if it is a fish or not. It does this based on factors like the size of the object and the strength of the sonar return. In the case of Deeper sonars, we use an advanced algorithm in the Fish Deeper App to interpret the data. Unfortunately, even the most advanced units aren’t 100% accurate in interpreting correctly.
-
Fish Arches
With fish icons switched off, how do you identify a fish on your sonar display? Look for the arches.
Fish will show up on your screen as an arch (the reason why they are shown as an arch is explained in detail here). But it’s important to remember these arches can vary in size (length and width), and might not be a full arch – look out for those half arches too. The screenshot below gives some nice examples of different arches. They vary in length and width, and some are not full arches, but these are all fish.

2. Judging fish size
Now you have spotted some fish arches, it’s time to make sense of what each arch tells us about how big the fish is. So let’s discuss length, thickness, and half or full arches.
Collapsible content
Fish arch length
The most common mistake anglers make when reading their fish finder is thinking that a long arch means a big fish. This is not the case. On your sonar display, you should think of length as representing time. For example, imagine you keep your fish finder stationary in the water (in other words you are not reeling or trolling it). If there is a fish underneath that is also stationary, what will you see on your fish finder display? You will see one continuous line. That doesn’t mean there’s a blue whale stranded in the pond you’re fishing. It means there is a stationary fish under your fish finder, and it might be a very small one.
Now let’s imagine another scenario – again your sonar is stationary, but this time 2 fishes swim through your sonar beam, one big and one small. The big fish swims very quickly through the sonar beam, the small one swims slowly. Which one will make the longer fish arch on your screen? The answer is the small one. That’s because a slow moving object will leave a longer mark than a fast moving one, whatever their size.
Take a look at the screenshot below. This return is from a school of bait fish. Notice how long some of the arches are. This may be because the sonar is stationary or moving very slowly, or because the fish are only moving slowly. Either way, it’s a good illustration of the fact that a long fish arch does not necessarily mean it’s a big fish.
Fish arch width
So length is not a very good indicator of fish size. It’s much better to look at the width of the fish arch shown.
Just remember this when you are interpreting fish arches:
think vertical, not horizontal.
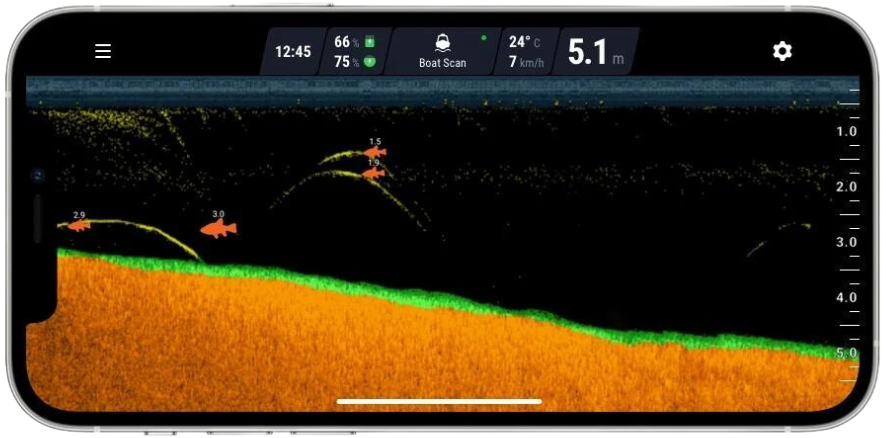
Even if the arch is short, if it is thick then it means the return has come from a big fish. Take a look at this screenshot again. Of the 4 fishes shown, which one is the biggest?
The answer is the fish on the bottom right. All the arches are roughly the same length (and they are all quite short). But the thickness of the bottom right arch tells us it is the biggest fish. This fish is not a monster, but it would be a decent catch.
Handy tip – use the vertical flasher
Here’s a useful tip for judging the width / thickness of a sonar return: switch on the vertical flasher (also know as a-scope) on your fish finder if it has one (to do this on the Fish Deeper App, go to Settings > Sonar > Vertical Flasher). The vertical flasher on the right side of your screen will show you exactly what’s under your sonar at this exact moment. You can use it for vertical jigging, and of course for ice fishing too. For judging fish size, look at both the thickness and width of the returns on your vertical flasher. A larger fish will give both a wider and a thicker return.
Half or full fish arches
The final point to remember when you are looking out for fish arches is that it doesn’t need to be a full arch. Half arches (like the ones shown in the screen shot above) also show that there is fish. In our tutorial on how sonars work, we explain in detail why sometimes you get a full arch and sometimes you get a half arch. The short answer is that you will get a full arch if a fish swims through the whole of your sonar cone, and a half or partial arch if they only swim through part of it.
But what’s important to remember when reading your display is that a half or partial arch could still be a big fish – the quality of the arch is not an indicator of how big the fish is.
So be on the look out for both full and partial arches, and remember that the thickness of the arch is the best indicator of fish size.
Finding bait fish on your fish finder
Bait fish will show on your display as dashes, lines or even just dots, so they can sometimes appear similar to vegetation. There are 3 key differences though:
- The bait fish will usually be suspended in the water, not on the bottom;
- The your fish finder will show bait fish in a different colour to vegetation (in the case of the Fish Deeper App’s standard colour display, they show as yellow rather than green).
- The bait fish will often be in balls, which will then be shown like a cloud or cluster, rather than lines.
The screenshot below shows both individual bait fish and a ball of baitfish. Notice the difference in colour from the green vegetation on the bottom.
Spotting a trophy fish on your fish finder display
So, let’s bring together what we’ve learned by remembering 2 key points:
1. Think vertical, not horizontal – the width of the fish arch is the biggest clue to the size of the fish.
2. Arches can be half or full – a half or incomplete arch doesn’t mean it is a smaller fish. Again, the width is your best clue.
Your fish finder isn’t going to tell you which species of fish it is, but now you know the size you have a good chance of working out the species based on the lake or river you’re fishing, and the depth at which you find the fish.
So when you see an arch like the one below on your screen, you’re about to catch BIG!
3. Identifying different types of underwater structure
Fish finders are ideal tools for reading depth, seeing the bottom contour and finding underwater features. Sometimes this information will be more valuable to you than actually marking fish. So let’s take a look at reading your fish finder display for underwater features.
Before we do this, just remember two things:

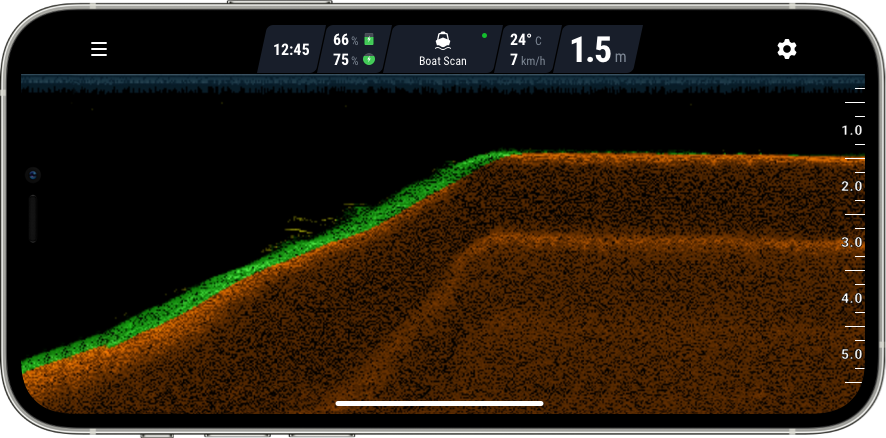
These are very valuable features to target for a range of species, and the good news is, they are easy to spot with a fish finder. As you troll or reel in your device, you will see the depth contour change – don’t forget to use the depth reader on your display (on the Fish Deeper App it’s in the top right corner of the screen) so you can track how quickly the depth is rising or falling.
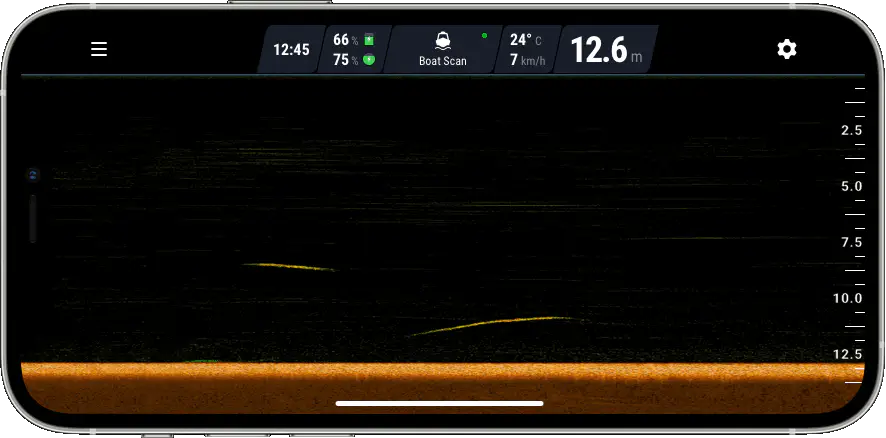
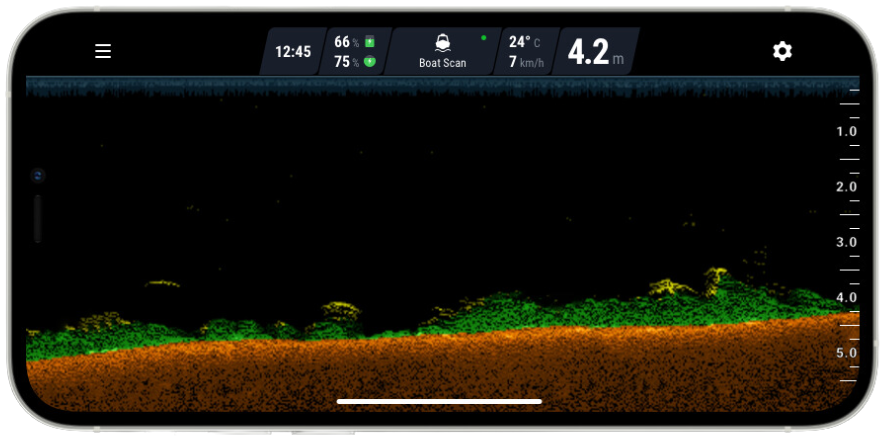
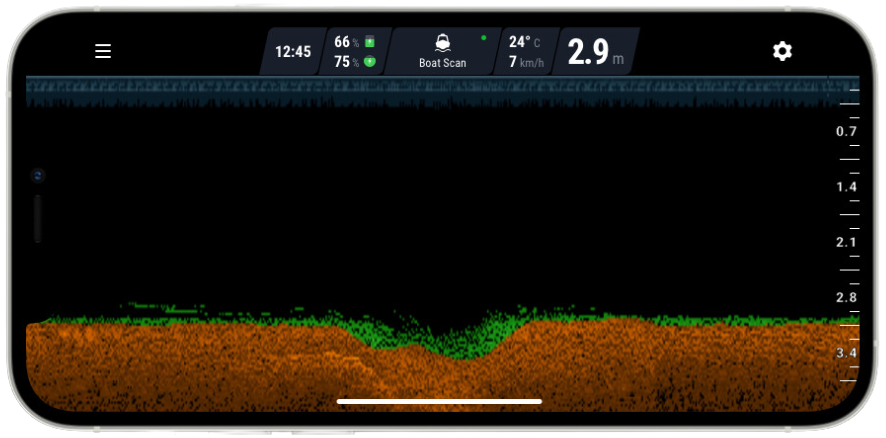
Drop offs and humps will be easy to spot, like the one shown below.
There are 3 tips that can help improve your accuracy when looking for these features:

These are also very popular features for a range of species, especially predators who will use them as ambush points.
The colour on your display is crucial here for identifying a brush and logs. Because they will send a different frequency of sonar return, your fish finder will show them in a different color to the bottom (otherwise, it will just look like a hump). So make sure you choose a color palette that will highlight this difference. In the Fish Deeper App, choose either the Classic color mode (where brush and logs will show green, like vegetation) or the Day color mode (where they will show purple).
-
Vegetation and weeds
You may want to locate vegetation and weeds as potential areas to cast to (for example, if you’re fishing topwater for bass in the summer), or as areas to avoid (for example, if you’re feeder fishing or want to avoid snagging).
Just like looking for brush piles and logs, the color will help you a lot. Weeds and vegetation will also feature vertical lines, and perhaps give a spottier return on your display than logs.
Here is an example of a drop off with lots of vegetation coverage.
-
Depressions
Especially for carp fishing, small depressions will be an ideal feature to target. Often these depressions are created by the fish themselves. Spotting them with your fish finder is easy – just look out for small, v-shaped dips in the bottom contour as you reel or troll.
-
Points
Points are more gradual than drop offs, but spotting them is just as easy (see the screen shot below). Make sure you maintain a steady speed when trolling or reeling so you get an accurate reading on how steep the incline is. You should scan with a narrow sonar beam to get the clearest reading, and to ensure you see any shelfs or humps which wider beam scanning might not pick up (our page on how sonars work explains why this is).


4. Using your fish finder to judge bottom type and hardness
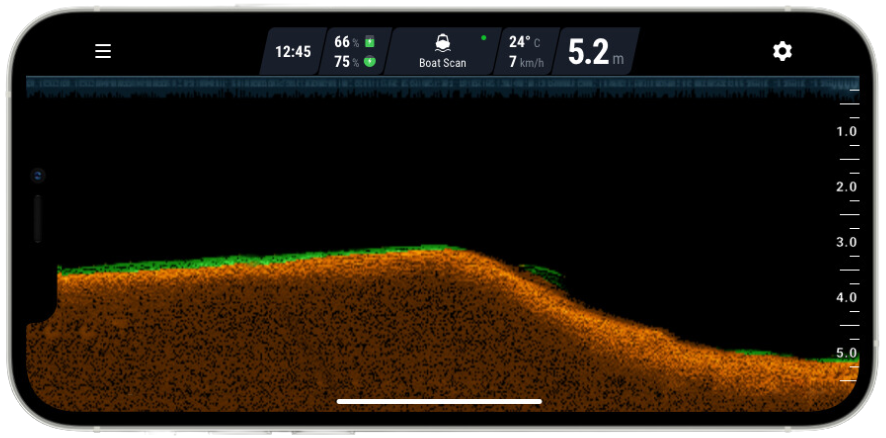
Whatever species you are hunting, knowing the hardness of the lake bottom and its consistency is another key piece of knowledge when you are trying to crack the code and get the fish biting.There are 3 factors to consider when working out if the bottom displayed on your fish finder is hard or soft: bottom colour, bottom thickness, and the presence of a 2nd bottom return or not.
-

Colour
The intensity of the sonar return from a hard bottom will be different to one from a hard bottom. Your fish finder uses colour to show this difference. In the standard colour palette of the Deeper display, the colour varies from dull brown (softest) to intense orange (hardest). In the day mode colour palette (see screen shot), the difference is even easier to see, with the colour ranging from purple (softest) to red to orange to yellow (hardest).
-
“2nd returns”
Just like the car we showed earlier, hard bottoms will send back very strong returns which sometimes bounce down off the surface again. These will show on your screen as a 2nd sonar return running parallel underneath the line showing the bottom. If you see one of these, it is another indicator that the bottom is hard.
-
Thickness
The thickness of the line representing the bottom is also a great clue to bottom hardness. Here the rule is simple – the thicker the line, the harder the bottom. But, be careful – sonar sensitivity can affect how thick the line is. The Deeper display has adjustable sensitivity. So if you turn up the sensitivity to 100%, the bottom line may appear thicker, if you turn it down to 10% it may appear thinner. So practice adjusting the sensitivity and get used to judging how much the bottom thickness varies based on this.


